Entry tags:
EUPHEMIA | 5 VARIATIONS

temp live preview
2.) Choose 2 Column/sidebar on left under Page Setup.
3.) Under Presentation, make sure user interaction links are set to display as text, and everything else is set as icons. It should look like this.
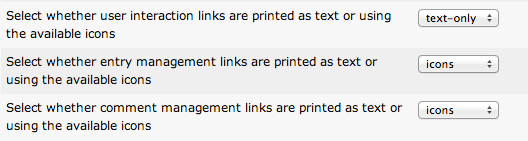
4.) !!! This part is very important. Under modules, make sure everything is disabled except: Navigation, Profile (check display default icon, uncheck display name and display website), Custom Text (optional), and Links List (optional). Navigation should be set to appear first, then Profile, then Custom Text or Links List. It should look something like this.
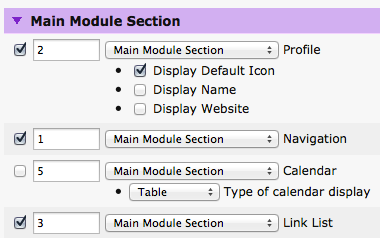
5.) I strongly recommended hitting 'Text' and changing the "Recent Entries" text to "Recent" and the "Member Posts" (if you're using the layout on a community) text to "Members." Otherwise, the navigation may look cluttered.
6.) Please, please save all images to your own server.
7.) Go to Custom CSS and uncheck "use layout's stylesheet."
8.) Paste and save! Codes are linked below.
9.) Credit!
EUPHEMIA DARK click for larger view temporary live preview | EUPHEMIA LIGHT click for larger view |
HAUNTED MILK click for larger view | MINT click for larger view |
MIGHTY SLATE click for larger view | + EUPHEMIA DARK |
no subject
ETA: OKAY HERE WE GO.
I updated the code for Euphemia Dark, so you can copy/paste that above. The others aren't updated yet, but I will get to that in a bit.
Now, for uploading the images to your own server. I'd recommend something like Tiny Pic. I was an idiot for ever choosing Photobucket because it's so easy to go over your bandwidth on there. :/
Anyway, here are the image links in the order that they appear in the code. I've also given you a keyword in parenthesis that you can use to easily identify where the image goes--hope that helps somewhat!
Let me know if you need help with anything else! xx
no subject
no subject
no subject